Building a high-quality metal building starts with careful planning and coordination with the client, construction crew, and subcontractors. Once the foundation and frame are in place, the metal wall panels and trim will need some field cutting and installation performed with the same level of care. That requires using the right tools and techniques for professional results.
“Installing metal wall panels and related trim requires attention to detail to deliver a weather-resistant and aesthetically pleasing result for the end customer,” said Shane Norman, senior product manager at Malco Tools. “Trade pros should master the use of various hand snips, specifically the right cutting and left cutting snips,” he added. “Knowing how and when to use which snip will produce the best-looking trim installation and will contribute to the longevity of the building by keeping it as weather tight as possible.”
A number of hand and power tools are available to cut metal panels. The best tool to use in each case will vary depending on the application and situation. “Manual hand tools will create a superior finish when it comes to the most detailed work required on the job, specifically all the trim that needs to be installed prior to installing the actual wall panels,” Norman said. “Power tools are also an important part of the job to make sure the crew is efficiently cutting the wall panels to the proper lengths and widths (when coming to an end condition like internal or external corners, protrusions on the building, etc.).”
Hand Tools
Aviation Snips
Aviation snips are manufactured in several common styles, including standard, in which handles are arranged in a straight line with the blades. The straight alignment makes it easier to visually align the scissors with the cutting line, especially for long cuts.
Offset snips feature handles set at an angle to the blades to allow more space between the worker’s hand and the metal.
Long-cut snips have longer blades that create longer — and therefore fewer — cuts to reduce hand fatigue.
Most snips are designed for right-handed users, but some companies manufacture snips for left-handers.
Aviation snips are manufactured with industry-standard, color-coded handles to designate left, right, and straight cutting blades. Left-cutting snips have red handles, straight-cutting snips have yellow, and right-cutting blades have green.

The left, right, and straight designation indicates the direction in which they’re intended to cut and that the main piece of metal to be cut is on that side and that the waste piece will fall on the opposite side. This is important to understand because if a worker tries to use a red (left-cutting) pair of snips to cut a curved section from a metal piece in a counterclockwise direction (with the main part of the metal on the right of the snips), the blades will bind because the blades are trying to move the main piece as though it’s the waste strip.
Guillotine Shears (Bench Shears or Lever Shears)
A guillotine shear is a long, curved blade mounted to a portable bench that resembles an office or school paper cutter. The advantage of the guillotine shear is that it creates long, fast, smooth cuts. Some guillotine blades can be ordered with grooves that match the panel’s profile to prevent the blade from deforming the panel as it cuts.
The guillotine shear is either used in-shop for cutting a quantity of metal panels before they’re taken on-site for installation, or used to cut panels as they’re needed on the jobsite.
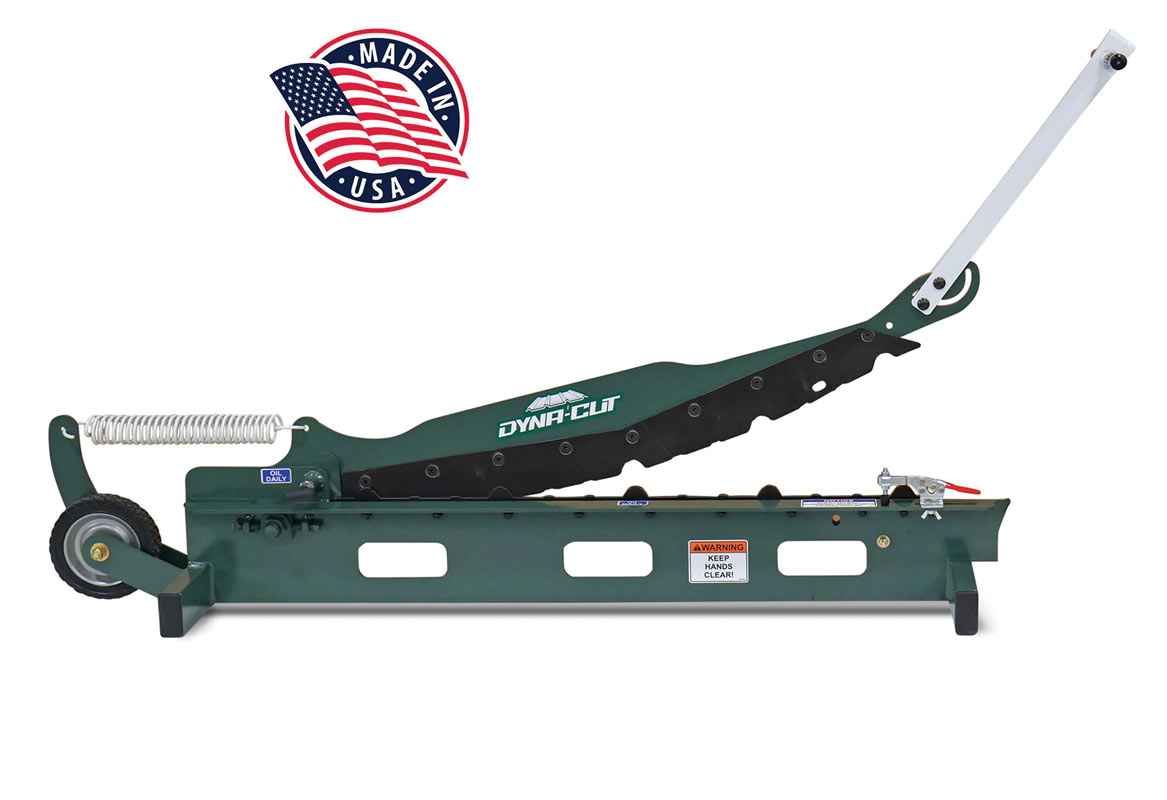
Dyna-Cut’s HRB-36 shear is built for speed, precision, and durability. With a single smooth stroke, it cuts full sheets of metal to length. Designed for versatility, it can also make angled cuts (from 3/12 to 5/12 pitch) when equipped with the optional angle blade set. Whether in a shop or on-site, the HRB-36 delivers clean, accurate cuts that save time and boost efficiency. Photo courtesy of Integrity Sales/Dyna-Cut.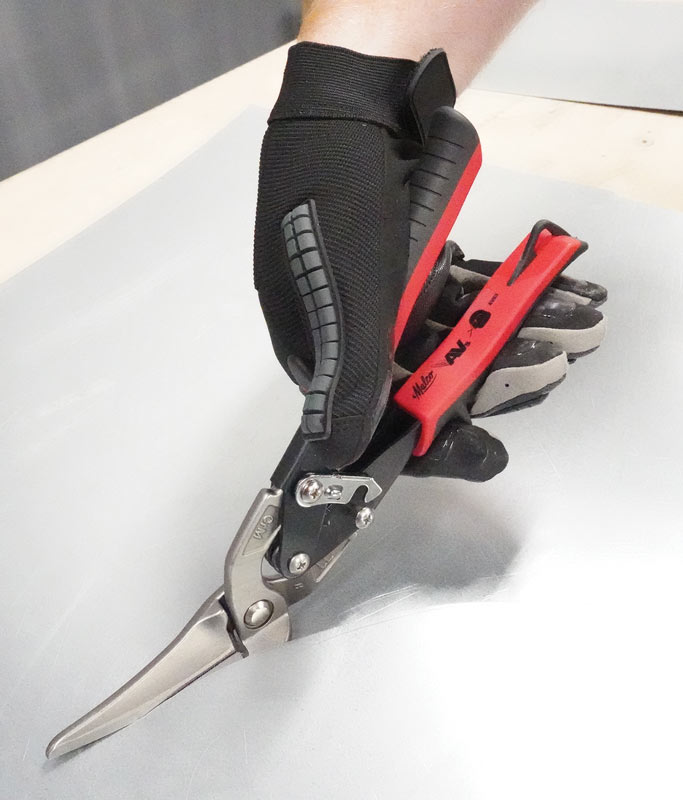
This pair of offset aviation snips made by Malco Tools has handles that are angled up from the cutting surface, allowing more hand clearance and control for more accurate, precise cuts with less hand strain. Photo courtesy of Malco Tools
Power Tools
Single-Cut Shears
Single-cut shears have a scissors-type mechanism, with a single upper moving blade that slices the metal panel on a stationary lower blade, or anvil. The shears apply pressure unequally to the sides of the cut, creating a slight bending on one side.
Double-Cut Shears
Double-cut shears use two scissors-type blades that each cut a line with equal pressure and remove the thin strip of metal between them. This creates a smoother cut than single-cut shears.
Rotary Cutters
Rotary cutters use a circular blade to slice through the metal for a fast, smooth cut.
Nibblers
Nibblers cut long straight lines quickly but — as their name suggests — they nibble the metal, leaving small crescent-shaped waste pieces. The chips are sharp and can injure workers, scratch metal panels, and find their way into machinery. Although nibblers typically come equipped with chip collection bags, stray metal chips can end up outside the bag.
Tool Applications and Tips
“The right tools for the job make all the difference for end results and an efficient workforce,” Norman said. “You would not want to use a power shear for intricate trim cuts, and likewise, there are more efficient ways to rip down a 10+-foot panel cut than using a standard hand snip.
“Aviation snips are primarily used for installing all the various trim pieces that go in before putting up the metal wall panels. Internal and external corners require trim pieces to be cut in ways that nest the mating pieces together and prevent water intrusion. The same goes for J-channel around doors and windows, which requires snips for cutting the pieces in a way that gives the best aesthetic and water-resistant install. Left- or right-cutting hand snips are used for detailed cuts, while a faster, more efficient power tool like Malco’s TurboShear™ Rotary Panel Cutter, is used to trim the larger wall panels to the proper height or width.”
Cutting to Protect Metal from Corrosion
Metal panels are galvanized or coated with Galvalume, which protect the carbon steel core from corrosion. The coating is designed as a sacrificial layer that’s consumed rather than the steel. As galvanic action wears down the coating, it covers and seals the edges of the cut steel to halt corrosion. It’s a form of self-healing, but it only works when the panel is cleanly sliced so the coating is smeared over the edge. Cutting techniques that diminish the coating or its self-healing properties may void manufacturer panel and paint warranties. The coating can be damaged in a number of ways, such as through abrasion that can cause rough spots or burrs, by creating high temperatures that melt the coating, and by blowing fine metal dust or particles over the panel that can stick and rust. The tools previously described are recommended because they won’t cause these problems. “They produce clean cuts that not only protect the metal but also help avoid warranty issues or costly rework,” said Nolan Woody, operating partner at Curbed Construction in Chattanooga, Tennessee.
Cutting Tools That Should Not Be Used
There are other cutting tools that should not be used. They include torches, circular saws, cutoff saws, reciprocating saws, grinders, and hacksaws. While they may be faster and save time in the short term, they can create intense heat from friction, generate metal dust, and produce rough edges, all of which can cause permanent damage and lead to high repair costs. “Some, like grinders and cutoff saws, which produce heat and airborne particles, can raise OSHA concerns,” Woody added. Builders should read and follow manufacturers’ instructions carefully so as not to void any warranties from using the wrong tools.
Conclusion
Installing metal trim and panels correctly requires using the right tools. It’s critical to follow the metal manufacturer’s instructions and rely on the recommended tools to avoid damage to the metal and warranty and callback issues later. MB